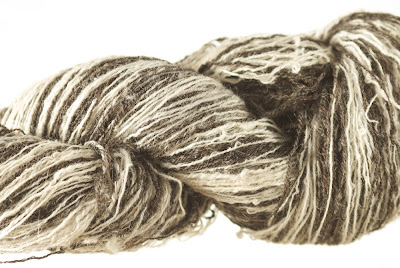
From this:
Beautiful Lincoln roving in natural colours.
To this:
I spun the roving, and Navajo plied it, to keep the colours separate.
It's over to the knitter now. I wonder how it will turn out?
Saturday, December 6, 2008
Friday, December 5, 2008
Tuesday, December 2, 2008
New Toy
My latest acquisition is a Voigtländer Nokton 58mm f/1.4 manual focus lens. I have no idea how this compares to the Nikkor 50mm lenses, but I think I'm going to have a lot of fun playing with it. It should make a pretty good portrait lens for the DX format Nikon D200, with a field of view equivalent to an 86mm lens on a 35m camera.
Thursday, November 27, 2008
Yogpot Gels
I have been doing a lot of pictures of Maggie's hand-dyed scarves and hankies for her Etsy store, and needed to be able to have a variety of background colours to (a), relieve monotony, and (b), to best show the colour of the subject. I have two backdrops, one Chromakey Blue, and one grey. These aren't really expensive - a 9x12 backdrop and support set can be got for $73 here on eBay. However, I have neither the money nor space for lots of different backgrounds, so I have been playing with lighting my grey drop with different coloured gels on a strobe, and have been quite pleased with the results.
For my gels, I used the plastic tops of yogurt pots - these are available in a large variety of flavours (I mean colours), are cheap and readily available, and they are considerably more durable than regular gels. They also clip very nicely to the front of my SB-26's (if I have a loose one, or if I need to have a strobe facing downwards, a small bit of Blu-Tac will hold it in place).
The only downside to these is that they don't transmit light as well as gels, so you need more power, but for my purposes, this was never a problem (as you see, I didn't even bother scraping the writing off the lids)
Here are the results - one backdrop, various lighting. And this is before I even start playing with cookies, more than one colour, shooting the strobe through glasses (with or without water), etc, etc, etc. Who needs loads of backdrops?
Thursday, November 6, 2008
Cute Kitties
Monday, November 3, 2008
What's in my Bag
Here's a look in my camera bag, if you're interested. This is how it looks today - tomorrow it might be completely different as I'm continuously tweaking and upgrading what gear I have. There's a labelled copy of this picture on my Flickr page.
(This picture was lit by window light, camera left; filled with my DIY Reflector, camera right).
Tuesday, October 28, 2008
Serried Schacht Spinners
Four Schacht spinning wheels lined up and ready for action.
Abi Hutchison of High Prairie Fibers invited a group of to visit her beautiful home and studio in eastern Iowa for a "Spinners' Play Day*" yesterday. Abi and her husband, Michael, who runs Iowa Parrot Rescue gave us a really wonderful time. We got to see old friends and new, the beautiful parrots, the new bird house, Abi's fabulous studio with her big drum carder and pin drafting machine, Michael and some of his friends played great music for us, and there was excellent food. A good time was had by all, and I, for one, am looking forward to the next such event!
Jill makes Navajo plying look easy
Abi Hutchison of High Prairie Fibers invited a group of to visit her beautiful home and studio in eastern Iowa for a "Spinners' Play Day*" yesterday. Abi and her husband, Michael, who runs Iowa Parrot Rescue gave us a really wonderful time. We got to see old friends and new, the beautiful parrots, the new bird house, Abi's fabulous studio with her big drum carder and pin drafting machine, Michael and some of his friends played great music for us, and there was excellent food. A good time was had by all, and I, for one, am looking forward to the next such event!
*OK, there were spinners, knitters, crocheters, weavers, and all manner of fibre artists there.
Jill makes Navajo plying look easy
The Riedel Deal!
We went to a garage sale the other day and picked up eight of these lovely Riedel wineglasses for 25 cents each! A nice subject to practise photographing glassware with!
I have posted the setup for this shot on my Flickr page.
Tuesday, October 14, 2008
DIY Reflector
I have long liked the idea of the California Sunbounce, but it's very expensive, so I decided to have a go at making my own. the frame was to be constructed from PVC tube, and fitted with a two-sided cloth cover, black on one side, and silver on the other.
Here is a brief description of the project:
First, as I wasn't too concerned with the overall dimensions of the finished product, the lengths to which I cut my tubes were purely arbitrary. The only measurement that mattered at this stage is the length of the handle piece, as it had to fit the frame. The lengths I cut were:
(A) 4 side pieces @ 19 3/4"
(B) 2 end pieces @ 24 3/4"
(C) 2 handle standoffs @ 3"
(D) 1 handle @ 19 1/4"
The fittings required are:
4 90 degree elbows
2 45 degree elbows
2 tees
(All the tubes and fittings are 3/4" Schedule 40)
The only tools needed for the job are a hacksaw, a measuring tape, and a marker or a pencil.
The completed frame.
I wanted to be able either to put the reflector on a lightstand, or to be able to attach an arm with a strobe on it. To do this I got a 1/4" x 20 coupling nut. Used for joining lengths of threaded rod, this is just like an ordinary nut but much longer. The one I got is two inches long.
I then drilled a hole on one of the tees, at a 45 degree angle to the plane of the tee, and bonded the coupling nut in place with epoxy resin adhesive. The portion of the nut sticking out from the joint will allow me to hold it with a wrench or adjustable spanner to avoid strain when affixing fittings.
Lightstand/tripod fitting with 5/8" stud attached.
The next thing to do it make the fabric covering. I used a remnant piece of black cotton. This was cut to size, hemmed and fitted with Velcro tabs.
Then we* stitched a piece of silver lame to one side, giving a reversible reflector/flag. (*"We" being Maggie. Thank you for your patience and help with the sewing)
Et voila! The finished reflector! And the cost? A bit under $25 - not too bad, eh?
Wednesday, October 8, 2008
Farm Crawl
It's been a long time since I blogged, so here goes:
We did the Farm Crawl on Sunday, a fun tour of six wonderful family farms just south of Des Moines. It was a fabulous day, and hundreds of visitors toured between the various farms. Each farm is unique, there's a goat dairy, a pumpkin patch, an orchard, honey and preserves, produce and livestock, all chemical-free and natural.
A steel Tyrannosaurus Rex skeleton sculpture at Pierce's Pumpkin Patch.
Marianne being chased by the dinosaur :)
Just some of the amazing variety of gourds and squash at Pierce's Pumpkin Patch.
Maggie meets some of the goats at Reichert's Dairy. These are LaMancha goats - they naturally have very tiny ears.
It's really refreshing, in a land filled with GM corn and beans, hog confinements, factory chickens and feedlots, that there are people that really care about the environment, food quality, sustainable farming, and the general health of our planet, and are actually DOING something about it. Congratulations to Blue Gate Farm, Reichert's Dairy Air, Dan-D Farm, Pierce's Pumpkin Patch, Coyote Run Farm and Schneider Orchard! Keep up the good work!
Wednesday, September 10, 2008
Back to School
I've enrolled in the New York Institute of Photography's Complete Course in Professional Photography, and the course materials have started arriving! Yesterday I got my student I.D. card and welcome package, and today I received Unit 1 of the course, which includes the first four lessons, audio CD's, a DVD, my first assignments, and loads of other interesting stuff! 'm really looking forward to getting going with this course!
I'm a student, and I have a card to prove it!
This should keep me out of mischief for a little while ;o)
Friday, September 5, 2008
Garage Studio
I have recently been using the garage as a studio for some of my projects. This is mainly because my new Nikkor 70-200mm f/2.8VR lens has a minimum focus distance of 1.5m (5ft.), and I need the extra space. It's nice to have a bit of room to move about without having to climb over stuff.
And this is the setup for my "portrait" of one of Maggie's spinning wheels:
Both of these (and lots of other setup shots) are on my Flickr page, with detailed descriptions and technical notes. I'm always surprised by the number of views these setup shots get, usually more than the "final result" photos.
This is the setup I used for the latest series of scarf shots I took for Maggie's Etsy store:
And this is the setup for my "portrait" of one of Maggie's spinning wheels:
Both of these (and lots of other setup shots) are on my Flickr page, with detailed descriptions and technical notes. I'm always surprised by the number of views these setup shots get, usually more than the "final result" photos.
Friday, August 29, 2008
Needle II
Thursday, August 28, 2008
Monday, August 25, 2008
Tunnel Vision
Our Friends at Blue Gate Farm had their poly tunnel demolished by a tornado in May, and we went down yesterday to help them build their new one. Tons of photographs were taken, but I kinda like this one :)
Left to right: Sean, Maggie, Jill.
Friday, August 22, 2008
Jam!
Yet another birthday present! This time from our good friends Jill and Sean at Blue Gate Farm. I think birthdays are cool - I ought to have them more often :) I'm really looking forward to tasting this!
Monday, August 18, 2008
Mamiya Pics
I shot a couple of films through my new Mamiya RB67, and got them processed today. There are a couple of minor problems - the darkslide interlock isn't working, which means that it's possible to shoot frames without actually exposing the film, and the flash sync is intermittent, so not all flash pictures work. But apart from those hiccups, I'm quite pleased with my new toy.
Here's the very first frame I took, of our house. The light was really hard and contrasty, and not very good for testing a new camera. I used Kodak Portra NC, and the exposure was 1/250 sec at f/11.
This one is of the lovely Hippie Bus that Des and Karen sent me for my birthday, using available light. The exposure was 1/8 sec at f/4.
Tuesday, August 12, 2008
Adel Sweetcorn Festival
One of the highest points on Adel's calendar is the Annual Sweetcorn Festival, which is held in August every year. There's a parade, market, sideshows, bouncy castles, food, music, rides, and....
...sweetcorn. More than seven tons of it. And it's free!
All sorts of vehicles took part in the parade - there was even a lawnmower!
Some of the corn being unloaded...
...cooked...
...served...
...and enjoyed!
Shoppers at a vendor's stall in the Square sporting this year's festival tee-shirts :)
Festival goers enjoying the sunshine and atmosphere by Adel's beautiful courthouse.
Taking a break!
Friday, August 8, 2008
Getting Agait
Subscribe to:
Posts (Atom)